How to Build Your Own In-House Mini Video Studio
If your business is integrating video into its marketing strategy, an in-house mini video studio could be a worthy investment. A small, yet versatile, mini studio can reduce your marketing overhead, while improving efficiency and output schedules by making it extremely simple for any of your team to record high quality, professional looking content without ever leaving the office. Product demonstrations, tutorials, webinars, podcasts and even internal communications can be produced more quickly without the extra cost and hassle of renting studio space and building a set.
Getting a studio set up can feel daunting, but fear not! We’ve broken down everything you’ll need, from location to equipment, so you can build your own recording studio with ease.
Finding the Perfect Space
Choosing a space for your mini-studio shouldn’t be a hassle. Here are some things to keep in mind while considering your options:
Peace and Quiet
When looking for a spot for video-recording, quiet is key. A noisier space can quickly lead to unwanted audio issues that complicate the production process. Main entrances, stairways, elevators and other high traffic areas should be avoided.
Once you’ve found a spot, it’s best practice to test out the noise level. Try sitting in the space during a busy time of day, for at least half an hour. It may seem tedious, but this will give you a good idea of the sounds you’ll be competing against. Are the neighbours upstairs heavy footed? Can the meeting next door be heard loud and clear? Some noise may be unavoidable, but don’t fret – moderate amounts of noise can be mitigated with a bit of sound-proofing.
Less is More
While it may be a challenge, an empty or barely used room is preferable for your mini video studio. An empty office, a rarely booked conference room, or even a large closet could all be perfect spaces to set up in. Less usage means less traffic, and, if you’ll need to keep the space multi-purpose, less work setting up and adjusting your equipment when you’re ready to film.
Windows are a mixed blessing
A windowless space can save you a lot of headache when it comes to noise… but can cost you more in lighting. It’s much more affordable to use the lighting that the natural light from a window provides. However, if street noise is an issue, it may be better to choose a windowless room or block the windows off and use a bit of extra lighting.
Getting the Right Gear
Once you’ve got a space picked out, it’s time to gather the equipment you’ll need to start creating top notch videos. Now, we know that hearing “camera equipment” can make you see dollar signs, but don’t stress. These days, the average smartphone camera is more than enough to produce high quality video content!
A ring light, smartphone, and a simple bluetooth microphone can really be all you need to get started. That being said, if you are wanting to get your hands on some dedicated camera equipment, we’ve broken down what you’ll want to look for.
Camera
Most DSLR cameras will serve you well for many kinds of video content, but there are still certain features to keep your eye out for:
- AC power – While not absolutely necessary, finding a camera that can function while plugged directly into the wall will save you from a dead battery interrupting your recording.
- Autofocus – The vast majority of digital cameras today will have this feature, but it’s still good practice to double check that yours does too.
- Tripod mount – You’ll certainly want a camera that can be easily be used with a tripod, and don’t forget the tripod itself!
- Optional auto-sleep/auto-turn off mode – Certain DSLRs have a power-saving feature that turns the camera off if no buttons have been pressed in 30 minutes. There’s nothing worse than realizing after-the-fact that your camera has shut off mid-recording, so it’s a good idea to get a camera that won’t do that.
Lighting
As we discussed earlier, you can certainly make do with natural light. Nonetheless if you need or want to upgrade your lighting setup, we’ve broken down some options:
- Ring Light – A very affordable option, and surprisingly versatile! Ring lights are great for lighting products and people alike.
- 1x1ft LED Panel with diffusion – This setup is a fantastic option for just about any kind of video you can imagine. LED panels typically include the ability to adjust both how bright, and how warm/cool the light is. Not to mention, they’re also quite affordable!
- Box Light with diffusion – Also known as Chimeras, these larger box lights are common on professional film sets. They’re very versatile, though they do take up much more room than the previous options we’ve discussed and come with a significant price tag.
Microphone
For the wide range of videos you can film in your mini-studio, a directional shotgun microphone will serve you well! Unwanted sound can be a major issue when filming in an office space, and a shotgun mic is great at reducing noise from other directions.
For even higher quality audio, consider installing sound dampening panels in your recording space. While not absolutely necessary, they can really improve your sound clarity.
Laptop Accessories
If you’re planning on live streaming from your mini video studio, having an HDMI/USB converter available will be a godsend. With that handy, anyone wanting to host a live streaming event will be able to hook their laptop up to your studio’s camera and mic setup with ease. The incredible video and audio quality of your webinars, video podcasts and Zoom meetings will impress even the pickiest viewers!
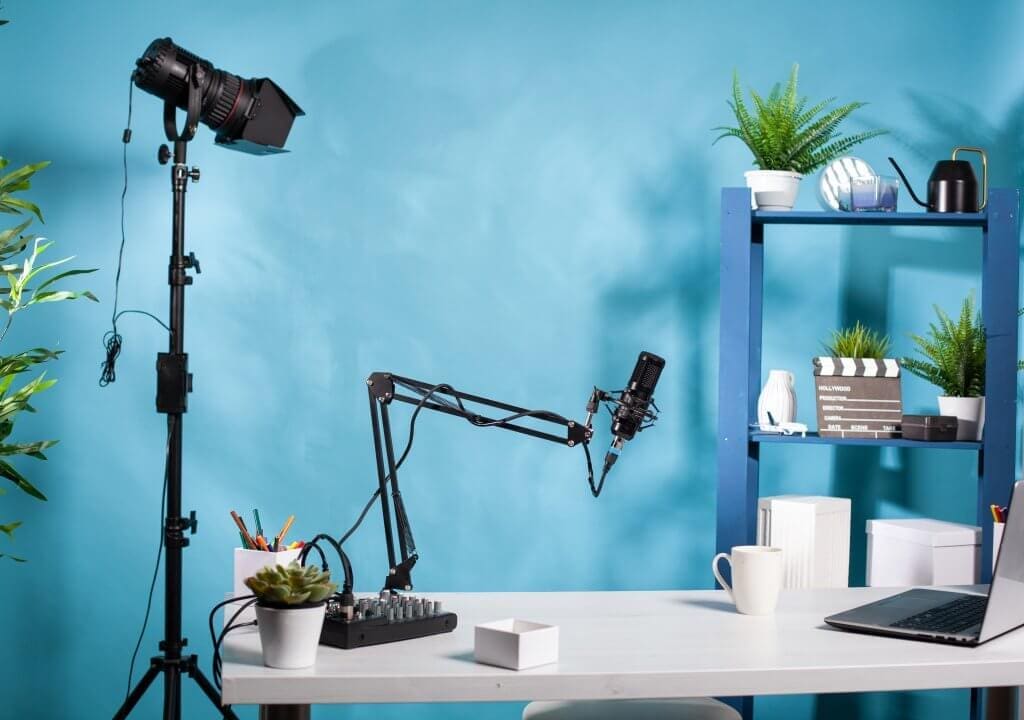
Building Your Set
When considering how to stage your mini video set, simplicity is key. Start with a desk, and preferably a simple one. It may seem obvious, but it’s worth mentioning nonetheless!
A plain white wall isn’t the most visually appealing backdrop, but there are a few easy ways you can jazz up your space. While you don’t want to clutter your shot, a touch of decor can liven things up with minimal effort. We’ve included some examples below of some simple, yet eye-catching sets:
A roll of seamless paper or plain fabric is also a great option for a simple backdrop. It can add a nice pop of colour to your videos, and the easy set up and take down is helpful if you’re filming in a multi-purpose room.
Making the Space User-Friendly
When building a mini-studio to be used by several employees, it’s important to make it as easy as possible to use. Here are some ways to make recording in your mini studio accessible for even the most novice content creator:
Stay Organized
A label maker can be really useful to help guide folks through the video making process, sans producer. Consider labeling which lights should be on/off when recording, which cords should remain plugged in, or even which buttons to press (or not to) on your camera! You can also use labels on drawers or shelves to help any equipment that may be stored away when not in use well organized and easily findable.
Wall-mounted power strips are great for keeping cables and wires out from under foot, and labeling the cords can save time spent figuring out what connects to what. Keeping cables and accessories well-organized will help keep the space from becoming messy, overwhelming or even hazardous!
Keep Your Camera Settings Adjusted
Taking the time to adjust your camera settings before the studio is in use can be a godsend for the video newbies in your office. Not everyone has experience with cameras, so this can really help ensure you’re getting the best shots possible.
First, you’ll want to turn on autofocus and face detection, if possible.
Next, you should manually adjust the camera exposure to what looks best, and lock it to that setting.
And, if your studio will remain in place between filmings, choose your composition and lock your tripod in that position.
Just like that, you’ve built your very own mini studio!
Now that you have a dedicated recording space, producing engaging, high quality and professional-looking video content will be a breeze. Anyone on your team will be able to utilize the space with ease, regardless of their level of experience. In a few simple steps, you’ve reduced your marketing overhead and streamlined the process of producing tutorials, webinars, product demonstrations, and anything else you can think of to film in your studio!
We wish you the best in your video creation journey, and please feel free to tag us @backlotmedia if you build your own mini studio – we’d love to see what you get up to!
If, when all is said and done, you’re wanting video marketing professionals in your corner, remember we’re just a phone call away!